VSCode Integration
VSCode has beautiful integration for developing in containers. See here https://code.visualstudio.com/docs/remote/containers for a detailed description of this feature.
When running VSCode with a developer container:
All integrated terminals run inside the container
The test explorer will run tests inside the container
File dialogs will browse the container’s file system
Python and C++ debugging are available for processes running in the container
Initial Setup
Install remote development plugin
Run up VSCode and install the remote development plugin:
module load vscode
code
Then inside VSCode:
Ctrl+P
ext install ms-VSCode-remote.VSCode-remote-extensionpack
Update VSCode User settings
Add the following settings to you user configuration for VSCode in
$HOME/.config/Code/User/settings.json
These settings ensures that each terminal loads the bash (login) profile by default. Bash will then run .bash_profile and this includes essential setup for DLS controls developer environment.
"terminal.integrated.defaultProfile.linux": "bash (login)",
"terminal.integrated.profiles.linux": {
    "bash (login)": {
        "args": [
            "-l"
        ],
        "path": "bash"
    }
}
This setting tells remote container development to use podman instead of docker.
"remote.containers.dockerPath": "podman"
How to Use
To use VSCode with a developer container, first add the
.devcontainer folder with devcontainer.json
file to the root of your project. The script has a helper to do this:
c7 -I
or you can create it manually:
cd <my project folder>
mkdir .devcontainer
cd .devcontainer
wget -q https://raw.githubusercontent.com/dls-controls/dev-c7/main/.devcontainer/devcontainer.json
Then launch VSCode:
cd <my project folder>
module load vscode
code .
Click on Reopen in Container when you see a dialogue with the message
Folder contains a Dev Container configuration file.
Close the first terminal that you see and open another one (see Known Issues)
That’s it, you are now running a developer container and your vscode session is connected to it.
The above gets version 2.0.0 which is current as of 01/07/2022. See https://github.com/dls-controls/dev-c7/releases for the latest updates.
Container Lifetime
Like the c7 script, the container will be kept alive. If you
exit and re-enter VSCode you will be reconnected to the same container.
When you run podman ps you will see the container is running and is named
something like this:
localhost/vsc-dev-c7-914745539fc385a5fe9188693f0fa257-uid
You can recreate the container from scratch by deleting it with podman rm
or you can tell VSCode to rebuild it using the remotes menu. This menu is
accessed by clicking the icon in the very bottom left of the VSCode window.
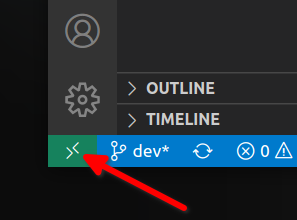
The Remotes Menu Button
The remotes menu option Rebuild Container will close the session,
rebuild the container
and reopen the session in the new container.
Note that this means that the containers used by VSCode and those used
by c7 are distinct. So if you install something into one it will
not be seen in the other.
Note
VSCode will use a different container for each folder. If you would like to share a container between folders:
open multiple folders in a single VSCode session by choosing “Add Folder to Workspace” from the right click menu in the File Explorer
choose
File->Save Workspace As...and save the workspace to a file, usually in the folder that is a common root to your projects.copy the
.devcontainerfolder to the same folder as the workspace file.go to the remotes menu (icon in bottom left of VSCode) and choose
Reopen Container
VSCode Container Removal
If you want to remove all of the containers that VSCode has created then the following will do the trick:
podman rmi -f $(podman images --filter=reference='*vsc-*' -q)
This may be useful if you are having trouble with VSCode devcontainers or if you are running low on disk space.
Known Issues
First integrated terminal
When a devcontainer is launched, it will usually start a single terminal that is NOT using the login profile. This means you won’t see your usual bash prompt and none of the DLS development environment will be available.
To work around this, close and reopen the 1st terminal or type:
bash -l